The 5 Most Common Pressure Washing Mistakes You Should Avoid in 2022

If you’re getting ready to pressure wash your home or office, make sure you don’t fall prey to these common pressure washing mistakes so that you can clean your property safely and effectively. Pressure washing, also called high pressure cleaning, is an important part of maintaining a clean exterior, but it’s easy to do things wrong if you aren’t careful. Here are the five most common pressure washing mistakes you should avoid.

1. Improper Surface Preparation

The biggest pressure washing mistake that you can make is attempting to power wash a surface that hasn’t been properly prepared. This can cause serious damage and premature wear on your equipment. To prevent premature wear, be sure to take off all loose materials with a scraper or by sanding first. If you aren’t using chemicals, scrubbing with warm water works as well.

2. Choosing an Inadequate Nozzle or Wrong Setting

High pressure nozzles come in various shapes and sizes. In general, you’ll want to choose a nozzle that is appropriate for what you’re cleaning – if you are cleaning a particularly dirty surface, choose a higher number; if your application calls for soap or detergent, adjust your nozzle to accommodate. Not choosing an adequate nozzle for the job can lead to erosion of surfaces, so it’s important to know what you’re working with. If you have questions about which nozzle or setting will work best for your needs, ask a professional pressure cleaning service. They will be able to recommend what type of nozzle and/or pressure level is appropriate for your needs.

3. Ignoring Safety Precautions

Pressure washers are powerful machines. In fact, they’re capable of blasting through caked-on dirt and grime without a problem. However, you’ll have to learn how to use them safely in order to avoid injury. Never point it at yourself or anyone else. (Pressure washers can cause blindness.) Also be sure that you’re working on flat ground and wearing protective gear like boots, gloves, and goggles when you start up your pressure washer. It’s important to read all safety precautions before operating a pressure washer—and following them!

4. Not Protecting Surfaces During Pressure Washing

Sure, a pressure washer can clean pretty much anything, but that doesn’t mean you should use it on everything. Metal surfaces and wooden furniture are two common items that should always be protected with proper covers. Also, avoid using your pressure washer to clean walls or even concrete sidewalks—these jobs are best left to commercial cleaning services and their specialized equipment. Remember: If you wouldn’t wipe your shoes on something or put a glass down on it, don’t blast it with water!

5. Not Following Manufacturer’s Recommendations

Following the manufacturer’s recommendations is not just about protecting your investment. It can also keep you from making expensive repairs down the road, which will help to ensure you enjoy your pressure washer for years to come. If you need to replace certain parts, consider buying from a manufacturer who offers replacement parts. This can help save money in addition to reducing environmental waste since you won’t be replacing any worn out items with new ones.

Conclusion

When it comes to pressure washing, sometimes a few simple mistakes can make all of the difference in getting your home or office back to looking beautiful. And if you make one of these five common pressure washing mistakes, chances are you’ll spend more time, money and energy than necessary for what should be a clean and easy process. So remember: when in doubt about how to do pressure washing right, contact an expert. They’ll know what you’re doing wrong before it even happens!

5 Tips to Pressure Wash a House

Any type of exterior gets dirty and dingy over time, but pressure washing, also known as high-pressure cleaning, can quickly restore your home to its former beauty. Learn how to pressure wash your house with these five tips.

1. Choose a Pressure Washer

Depending on the exterior of your house, you may need to use a certain type of pressure washer. For example, Vinyl siding can withstand a powerful gas pressure washer (2,500-3,000 psi), and Aluminum, stucco or soft-grain wood homes will do better with a less powerful pressure washer (about 1,200-1,500 psi). When choosing a pressure washer, also determine whether you need any accessories such as pressure washer extension wands or pressure washer telescoping wands, which are helpful when pressure cleaning two-story homes or hard-to-reach areas.

2. Prepare the Place and Put on Safety Gear

Once you choose the pressure washing machine, it’s time to prepare the cleaning place and put on your safety gear. Before you begin, remove or cover things like light fixtures and air conditioner compressors to protect them from damage. Use a plastic covering over shrubs and garden plants. Secure the tarps in place with duct tape, and note the location of windows and electrical outlets to ensure you avoid them while doing the high-pressure cleaning. Also, do not stand on a ladder when using a pressure washer. The pressure could cause you to lose your balance as well as never drive water directly into gaps or cracks in your home’s exterior. Besides, keep your pressure washer wand at least 6 feet away from electrical wires and never spray water into outlets. More importantly, never point a pressure washer at other people or pets and be sure to wear the proper protective gear, when pressure washing a house.

3. Set Up the Pressure Cleaner

Take the following steps to set up the pressure washer: Use a 5-gallon water bucket, mix water and a cleaning detergent with a mildewcide, attach your pressure washer to your garden hose, choose the pressure washer nozzle you plan to use and attach it to your sprayer, Take a step back about 3 feet from your home and test the pressure washer against the house and finally, adjust your stance and spray until you feel the pressure is strong enough to remove dirt without damaging your home’s exterior.

4. Do the Cleaning From the Bottom Up

Now that your cleaning solution is mixed and you’ve tested your pressure washer, it’s time to begin the high-pressure cleaning. Using the cleaning solution, start pressure washing at the bottom of the house and work your way up. Washing from the top down can cause water and suds to run down the side of the house, And, When spraying roof overhangs and gutters, always maintain a 45-degree angle. Also, do not pressure wash your home if it’s been painted with lead paint.

5. Finish the Cleaning and Let Dry

Once you have done the high-pressure cleaning of your home, turn off the pressure washer and disconnect it from the garden hose. You can check the manual for the proper steps for storing the pressure washer, such as draining liquid from the pump when the pressure washing is finished, and removing all tarps, drop cloths and duct tape. Also, if you plan to paint after the high-pressure cleaning, allow the home’s exterior to completely dry. This typically takes about two days.

Conclusion

Learning how to pressure wash your house is a good way to keep your house looking its best, especially if you want to prepare your house for a fresh coat of paint. You can also hire professional high-pressure cleaning service providers for your house’s pressure washing requirements.

How To Regrout A Shower? – Effective Shower Regrouting Tips 2021

Do you want to remove your old shower grout and replace it with brand new shower grout? No worries! Today, in this post we will show you how to regrout a shower and all the materials you need to complete this time-consuming shower regrouting effectively.

Let’s dive into the topic!

1. Materials Needed for Shower Regrouting

Like any other cleaning, shower regrouting also needs some basic materials and tools to complete the job more easily. For any shower regrouting cleaning, make sure you purchase these below things:

  • Utility Knife
  • Grout Remover or Grout Rake
  • Vacuum
  • Caulk
  • Grout (waterproof)
  • Grout Spreader or Grout Float
  • Mixing Bucket
  • Putty Knife or Grout Mixing Tool
  • Sponge & Cleaning Supplies
  • Dusk Mask
  • Goggles
  • Masking Paper

Now, let’s check out the tools that can make your shower regrouting process easier and less time-consuming. In addition to all the materials listed above, we recommend you to purchase the below things:

  • Electric Grout Remover
  • Caulk Gun
  • Stain (Colours Grout)
  • Grout Enhancer
  • Grout Saw
  • Scrub Brush
  • Gloves

2. How to Remove Grout?

Over time, grout has settled into place and formed a very hard surface in between all your bathroom tiles. If you use a standard grout removal tool, the cleaning process will be labour-intensive. In fact, that is why hiring a professional shower regrouting service provider is a bit expensive. To cut down on the intensity and labor of the shower regrouting cleaning, you could purchase an electric grout remover. It’s high-speed and effortlessly chews away old grout, also guides you between the tiles that prevent tile repairs.

Whatever tool you use, don’t forget to put on your goggles, dusk mask and rubber gloves before you start the work. Also, cover the tub and surrounding areas with masking paper, and if you are working near the drain, cover that as well. At the same time, turn on your bathroom fan and open all windows and doors.

Take your shower grout remover and place the blade tip directly on the grout. Then, firmly move across the grout as if you were butterflying a piece of chicken. Begin in the middle of the shower and move the way out. First, do the grout removal in the vertical lines, then move onto the horizontal lines.

Remember, in order to remove the tough shower grout, a little elbow grease will be needed. Also, be careful not to cut any of your existing tiles. Once you have removed all the old grout of your shower, clean the tiles with your chosen bathroom cleaning supplies.

3. How to Regrout A Shower?

Before you choose the grout, make sure you take an extra piece of your bathroom tile, or a picture of your bathroom tile, so that you can find out the right type and colour that go best in your shower.

Once you have completed the cleaning process, you can start mixing your grout (some grouts will come in ready-mixed forms). If you are mixing grout yourself, make sure to only mix the amount of grout that you will use in 30 minutes. Otherwise, the grout may become hard.

You can mix the grout with water or a grout enhancer. Grout enhancers can boost grout durability and stain resistance. Mix the grout using your putty knife until it becomes a creamy paste. Then, place a chunk of grout on your grout spreader. For larger showers, use a grout float, it will help you save your time and energy. Apply the replacement grout at a 45-degree angle. Work into the spaces between tiles so that you can make sure there are no air ­bubbles or gaps. You may have to use the edges of a grout spreader to push the remaining grout into its right spots. Don’t take breaks as the grout can harden in 30 minutes or less.

Once you are done with grouting, clean off all excess grout from the surface with a wet sponge. In case you accidentally remove any necessary grout while cleaning the surface, by using a putty knife you can add some grout back in the needed spots. If you wish, you can now apply new caulk to the outskirts of the shower. New caulk makes sense when you are doing a shower regrouting

After the grouting process, let the grout for 30 minutes to harden and then use a grout saw to even out the appearance. You need to let the grout sit for another three hours to settle, after that use some wet paper towels to remove the remaining powdery film.

Conclusion

Usually, shower regrouting takes lots of time and energy to complete the job effectively. However, this post explains how it’s done. So, now, you can do the shower regrouting effectively by yourself.

11 Benefits of Pressure Cleaning [Updated 2024]

In the bustling city of Brisbane, pressure cleaning has emerged as a go-to solution for property maintenance, offering a plethora of benefits beyond just surface cleanliness. As we delve deeper into the world of pressure cleaning as part of our comprehensive guide on the Pressure Cleaning in Brisbane, let’s explore the extensive array of advantages this cleaning method brings to residential and commercial spaces alike.

1. Enhanced Curb Appeal:

One of the most apparent benefits of pressure cleaning is its ability to instantly transform the exterior appearance of properties. By effectively removing stains, grime, and dirt from surfaces such as sidewalks, driveways, and building exteriors, pressure cleaning revitalizes the aesthetics of properties, enhancing their curb appeal and leaving a lasting impression on visitors and passersby.

2. Prevents Damage:

Beyond cosmetic improvements, pressure cleaning plays a crucial role in preventing long-term damage to various surfaces. By eliminating contaminants like mold, mildew, and algae, pressure cleaning helps safeguard surfaces from deterioration, preserving their structural integrity and extending their lifespan.

3. Increases Property Value:

For homeowners and business owners alike, maintaining the value of their properties is paramount. Regular pressure cleaning not only enhances the visual appeal of properties but also contributes to their overall value by keeping them in optimal condition. A well-maintained property commands higher resale value and attracts potential buyers or tenants.

4. Healthier Environment:

The accumulation of mold, mildew, and other allergens on exterior surfaces not only detracts from the appearance of properties but also poses health risks to occupants. Pressure cleaning effectively removes these harmful substances, creating a healthier environment for residents, employees, and customers and reducing the risk of respiratory issues and allergies.

5. Saves Time and Effort:

In today’s fast-paced world, time is a precious commodity. Pressure cleaning offers a time-saving solution for property maintenance, allowing for quick and efficient cleaning of large areas in a fraction of the time required by traditional cleaning methods. With minimal manual effort required, property owners can achieve pristine results without sacrificing their valuable time.

6. Eco-Friendly Solution:

As environmental consciousness continues to grow, so does the demand for eco-friendly cleaning practices. Pressure cleaning aligns with this trend by minimizing the use of harsh chemicals and relying on the power of high-pressure water jets to remove contaminants. By reducing chemical runoff and pollution, pressure cleaning promotes sustainable cleaning practices in Brisbane and contributes to environmental conservation efforts.

7. Versatile Application:

One of the standout features of pressure cleaning is its versatility. From concrete driveways and brick walls to wooden decks and outdoor furniture, pressure cleaning can be applied to a wide range of surfaces, making it an ideal solution for comprehensive property maintenance. Whether tackling residential properties, commercial buildings, or industrial facilities, pressure cleaning delivers consistent results across diverse surfaces.

8. Prepares Surfaces for Painting:

Before embarking on painting or refinishing projects, proper surface preparation is essential for achieving professional results. Pressure cleaning effectively removes old paint, stains, and debris, providing a clean and smooth surface that promotes better paint adhesion and ensures a flawless finish. By incorporating pressure cleaning into the pre-painting process, property owners can maximize the longevity and durability of their paintwork.

9. Cost-Effective Maintenance:

While some may view the cost of pressure cleaning as an extra expense, it delivers substantial long-term savings. Regular pressure cleaning prevents costly repairs and replacements by addressing issues early on, preserving surface integrity, and minimizing the need for expensive remediation measures.

10. Improved Safety:

Slippery surfaces pose a significant safety hazard, especially in outdoor areas exposed to moisture and algae growth. Pressure cleaning effectively removes these slippery substances, reducing the risk of slips, falls, and accidents on surfaces such as sidewalks, pool decks, and entryways. By enhancing safety, pressure cleaning creates a more secure environment for residents, employees, and visitors, mitigating liability concerns for property owners.

11. Professional Results:

Finally, entrusting pressure cleaning to experienced professionals ensures superior results that meet the highest standards of cleanliness and hygiene. With their expertise, specialized pressure cleaning equipment, and attention to detail, professional pressure cleaning companies deliver thorough and consistent cleaning results, leaving properties looking immaculate and well-maintained.

From revitalizing the appearance of properties to preserving their structural integrity and promoting a healthier environment, pressure cleaning offers a multitude of benefits for residential and commercial spaces in Brisbane. By harnessing the power of high-pressure water jets, property owners can enjoy enhanced curb appeal, increased property value, and cost-effective maintenance solutions. As we continue our exploration of pressure cleaning in Brisbane, stay tuned for more insightful content and expert tips to help you make the most of this versatile cleaning method.

The Ultimate Guide to Patio Cleaning: Tips and Tricks for a Spotless Outdoor Space

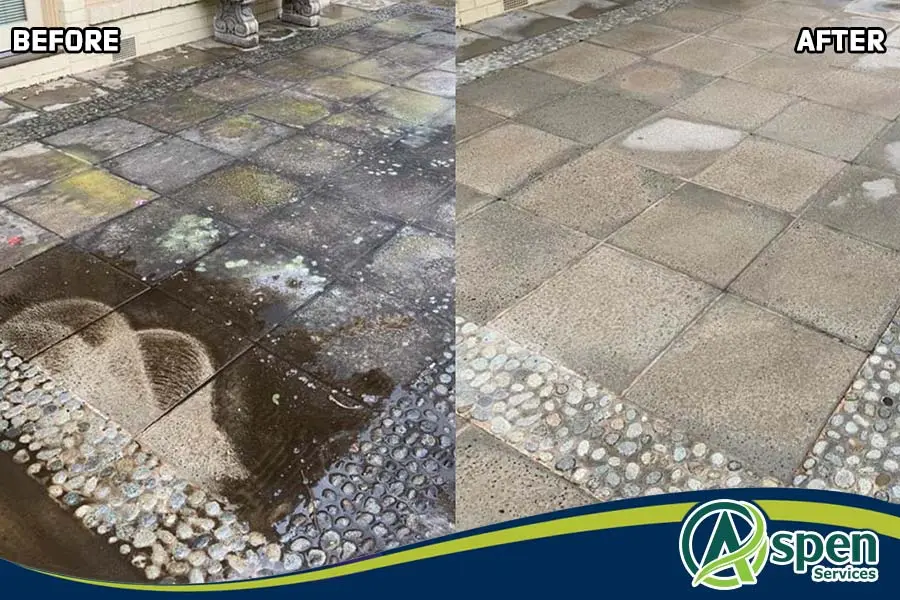
Are you tired of looking at a dirty and dull patio? Do you want to transform your outdoor space into a sparkling haven? Look no further, because this is the ultimate guide to patio cleaning. In this article, we will share with you an array of expert tips and tricks that will help you achieve a spotless patio that you can be proud of.

Cleaning your patio may seem like a daunting task, but with the right guidance, it can be a breeze. We will walk you through the step-by-step process of cleaning different types of patios, including concrete, stone, and wood. From removing stubborn stains and algae to tackling moss and mold, we have got you covered.

Discover the best patio cleaning solutions, tools, and techniques that will make your patio look as good as new. Whether you have a small balcony or a spacious patio, our guide will provide you with the knowledge and confidence to take on this cleaning project.

Say goodbye to dirt, grime, and unsightly marks on your patio. Get ready to create a stunning outdoor space that you can enjoy all year round. Let’s get started with our ultimate guide to patio cleaning!

Why is patio cleaning important?

A clean patio not only enhances the overall appearance of your outdoor space but also ensures its longevity. Over time, dirt, grime, and other debris can accumulate on your patio, causing it to look dull and uninviting. Additionally, these buildups can lead to the growth of moss, algae, and mold, which can be slippery and hazardous.

Regular patio cleaning not only improves the aesthetic appeal of your outdoor space but also helps prevent accidents and damage. By removing dirt, stains, and organic growth, you can ensure the longevity of your patio materials and keep them looking their best for years to come.

Tools and equipment needed for patio cleaning

Before you dive into cleaning your patio, it’s essential to gather the right tools and equipment. Here are some items you’ll need to make the cleaning process easier and more efficient:

  1. Broom or brush: A sturdy broom or brush with stiff bristles will help you remove loose debris and dirt from the surface of your patio. Opt for a broom with an adjustable handle to reach all areas effectively.
  2. Pressure washer: If your patio is particularly dirty or has stubborn stains, a pressure washer can be a game-changer. It uses high-pressure water to blast away dirt, grime, and even mold or moss. Make sure to use the appropriate pressure setting for your patio material to avoid damage.
  3. Scrub brush: For tough stains and hard-to-reach areas, a scrub brush will come in handy. Choose a brush with stiff bristles that can effectively scrub away dirt and grime without damaging the surface.
  4. Garden hose: A garden hose with a nozzle attachment will allow you to rinse off cleaning solutions and debris from your patio. Look for a hose with adjustable water pressure to control the flow.
  5. Cleaning solutions: Depending on the type of stains and the material of your patio, you may need different cleaning solutions. Common options include mild dish soap, vinegar, hydrogen peroxide, or specialized patio cleaners. Always follow the manufacturer’s instructions and test a small area before applying the solution to the entire patio.

Preparing your patio for cleaning

Before you begin the actual cleaning process, it’s essential to prepare your patio to ensure optimal results. Follow these steps to get your patio ready for a thorough cleaning:

  1. Clear the area: Remove any furniture, planters, or other items from your patio. This will give you a clear workspace and prevent any damage to your belongings during the cleaning process.
  2. Sweep or brush away loose debris: Use a broom or brush to sweep away any loose dirt, leaves, or debris from the surface of your patio. Pay attention to corners, cracks, and crevices where dirt tends to accumulate.
  3. Trim plants and vegetation: If you have plants or vegetation near your patio, trim them back to prevent leaves, branches, or flowers from falling onto the surface. This will make the cleaning process easier and reduce the chances of staining.

Now that your patio is clear and ready, it’s time to dive into the step-by-step cleaning process.

Step-by-step guide to cleaning your patio

Cleaning your patio involves several steps to ensure a thorough and effective result. Follow this step-by-step guide to achieve a spotless outdoor space:

  1. Wet the surface: Use a garden hose or a pressure washer to wet the entire surface of your patio. This will help loosen dirt and make the cleaning process more manageable.
  2. Apply cleaning solution: Depending on the type of stains and the material of your patio, choose an appropriate cleaning solution. Dilute it according to the instructions and apply it to the surface of your patio, focusing on heavily stained or dirty areas.
  3. Scrub the surface: Use a scrub brush or a stiff broom to scrub the cleaning solution into the surface of your patio. Pay extra attention to stains, algae, or mold growth. Apply more pressure if necessary but be cautious not to damage the patio material.
  4. Rinse thoroughly: Once you have scrubbed the entire patio, rinse off the cleaning solution with a garden hose or a pressure washer. Start from one end and work your way across the entire surface, ensuring you remove all traces of the cleaning solution.
  5. Inspect for remaining stains: After rinsing, inspect the patio for any remaining stains or areas that need additional cleaning. Repeat the cleaning process if necessary, focusing on specific spots that require extra attention.
  6. Allow to dry: Let your patio air dry completely before moving any furniture or accessories back onto it. This will prevent any dirt or debris from sticking to the surface and ensure a pristine finish.

Congratulations! You have successfully completed the cleaning process for your patio. However, there may still be some tough stains or discoloration that require special attention. Let’s explore some tips for dealing with these stubborn marks.

Tips for removing tough stains and discoloration

Despite your best efforts, some stains or discoloration may prove challenging to remove. Here are some tips and tricks to tackle the most stubborn patio stains:

  1. Oil and grease stains: Sprinkle cat litter or sawdust over fresh oil or grease stains to absorb the excess. Afterward, scrub the area with a degreasing dish soap and warm water mixture. Rinse thoroughly and repeat if necessary.
  2. Rust stains: Mix lemon juice or vinegar with salt to form a paste. Apply the paste to the rust stains and let it sit for a few hours. Scrub the area with a brush and rinse thoroughly. Repeat the process if needed.
  3. Mildew or mold stains: Mix equal parts water and bleach in a spray bottle. Spray the solution onto the affected areas and let it sit for a few minutes. Scrub the stains with a brush and rinse thoroughly. Wear protective gloves and ensure proper ventilation when working with bleach.

Remember to always test any cleaning solution on a small, inconspicuous area of your patio before applying it to the entire surface. This will help you determine if the solution is safe for your patio material and avoid any potential damage.

Preventing future dirt and grime buildup on your patio

Now that your patio is clean and spotless, it’s essential to take preventive measures to avoid future dirt and grime buildup. Here are some tips to keep your patio looking its best:

  1. Regular sweeping: Make it a habit to sweep your patio regularly to remove loose debris, leaves, and dirt. This will prevent them from settling and causing stains.
  2. Prompt stain treatment: Address any spills or stains immediately to prevent them from becoming more challenging to remove. Blot or clean up any spills as soon as they occur to minimize the chances of permanent staining.
  3. Use doormats: Place doormats at the entrances to your patio to reduce the amount of dirt and debris that is tracked onto the surface.
  4. Seal your patio: If your patio is made of porous materials like concrete or natural stone, consider applying a sealant to protect it from stains and damage. This will make future cleaning easier and prevent dirt from penetrating the surface.

By following these preventive measures, you can maintain a clean and spotless patio throughout the year.

DIY patio cleaning solutions

If you prefer using natural or homemade cleaning solutions, here are a few options to try:

  1. Vinegar and water: Mix equal parts white vinegar and water in a spray bottle. Spray the solution onto the surface of your patio and let it sit for a few minutes. Scrub the area with a brush and rinse thoroughly.
  2. Baking soda paste: Mix baking soda with water to form a paste. Apply the paste to stains or heavily soiled areas and let it sit for a few minutes. Scrub with a brush and rinse thoroughly.
  3. Hydrogen peroxide: Dilute hydrogen peroxide with water and apply it to stained areas. Let it sit for a few minutes, then scrub and rinse thoroughly. This solution is particularly effective for mold or mildew stains.

Remember to test these DIY solutions on a small, inconspicuous area before applying them to the entire patio.

Hiring professional patio cleaning services

If you prefer to leave the patio cleaning to the professionals, hiring a professional patio cleaning service can be a great option. These experts have the knowledge, experience, and specialized equipment to tackle even the toughest patio stains and dirt.

Before hiring a professional service, do thorough research, read reviews, and ask for recommendations from friends or neighbors. Ensure the service provider is licensed, insured, and offers a satisfaction guarantee.

Maintenance and care for a spotless outdoor space

Once your patio is clean and pristine, it’s important to maintain its appearance and extend its lifespan. Here are some maintenance tips to keep your outdoor space looking its best:

  1. Regular inspection: Regularly inspect your patio for any signs of damage, cracks, or loose pavers. Address any issues promptly to prevent further damage.
  2. Regular cleaning: Make patio cleaning a part of your regular maintenance routine. Set a schedule to clean your patio at least once or twice a year, depending on the level of dirt and usage.
  3. Protective covers: Invest in protective covers for your furniture and accessories to shield them from the elements. This will prevent dirt, leaves, and other debris from accumulating on your patio.
  4. Proper drainage: Ensure your patio has proper drainage to prevent water pooling or damage. Clean out any clogged drains or gutters regularly to maintain optimal drainage.

By following these maintenance and care tips, you can enjoy a spotless outdoor space for years to come.

Conclusion

Congratulations! You have reached the end of our ultimate guide to patio cleaning. We hope you found these tips and tricks helpful in achieving a spotless and inviting outdoor space. Remember, regular cleaning, preventive measures, and proper maintenance are key to keeping your patio looking its best.

Say goodbye to dirt, grime, and unsightly marks on your patio. With the knowledge and confidence gained from this guide, you can create a stunning outdoor space that you can enjoy all year round. Transform your patio into a sparkling haven and bask in the beauty of your spotless outdoor oasis.

Now, it’s time to roll up your sleeves, gather your tools, and get ready to make your patio shine. Happy cleaning!

Mould on Ceilings: How to Clean Off

Mould on ceilings is a common problem that can cause health issues, damage to ceilings, and an unsightly appearance. It is important to address mould as soon as it is noticed to ensure a healthy environment and clean ceiling. In this blog post, we will cover the importance of cleaning mould off ceilings, how to identify and eliminate the source of mould, and the three best cleaning methods for removing mould.

Identifying and Eliminating the Source of Mould

Before you can begin to clean the mould off your ceiling, it is important to identify and eliminate the source. Here are some tips for identifying and eliminating the source of mould:

  • Check for a roof leak: Water from a leaking roof is the cause of most ceiling mould. Without repairing the leak, the mould will return.
  • Improve circulation and ventilation: Mould often develops in kitchens and bathrooms which lack proper ventilation. Add extractors to release the moisture and fans to circulate the air.
  • Increase natural light: Mould grows best in dark spaces. Keep windows and curtains open to let the sunshine in. This prevents mould colonies from growing on the ceiling.
  • Improve insulation: Poor insulation encourages mould growth. When cold air from the outside meets warm air from the inside, it causes condensation. Improving insulation in your home creates a barrier, reducing mould growth conditions.
  • Check the other side of the ceiling: You may have mould on the other side of your ceiling. Removing the underside mould will not eradicate the mould problem.
  • Add dehumidifiers to the kitchen and bathroom: Mould grows in damp, warm conditions. Removing the humidity from the air reduces a colony’s ability to grow.

Keep the bathroom door open and the fan on after showering: Allow the humidity in your bathroom to escape. Leave the bathroom door open and the extractor fan on for 15 minutes.

Hang your towels in a different room: Wet towels add humidity to the bathroom. Drying your towel in another room reduces the mould growth conditions by lowering the humidity levels.

How to Clean Mould off a Ceiling

There are three main cleaning methods for removing mould off ceilings: vinegar, bicarbonate of soda, and hydrogen peroxide.

Cleaning with Vinegar:

Vinegar is a natural liquid that is useful for many things, including removing stains and killing germs. This mild acid kills 82% of mould types.

  • Pour distilled white vinegar into a spray bottle.
  • Spray it directly onto the mould and leave for an hour.
  • Wipe the vinegar off with water and let the area dry.

Cleaning with Bicarbonate of Soda:

Bicarbonate of soda is a mild powder that absorbs moisture, keeping mould away. It is also safe to use around children and animals.

  • Combine a teaspoon of bicarbonate of soda with water in a spray bottle and shake until it has dissolved.
  • Spray it directly onto the mould and leave for a few minutes.
  • Use a scrubbing brush or sponge to remove the mould, then wipe the solution off with water.
  • Spray the solution on the area again and let it dry.

Cleaning with Hydrogen Peroxide:

Hydrogen peroxide is anti-viral, anti-fungal, and anti-bacterial. It can be used to clean mould from ceilings, walls, and floors. However, it should be used with caution as it acts like bleach and affects delicate surfaces.

  • Pour concentrated hydrogen peroxide into a spray bottle.
  • Spray it directly onto the mould and leave it for ten minutes.
  • Use a scrubbing brush to remove the mould and stains.
  • Wipe the surface with water and let it dry.

Comparison of the Three Cleaning Methods:

All three cleaning methods are effective at removing mould from ceilings. Vinegar is the most commonly used method due to its availability and affordability. Bicarbonate of soda is also effective and has the added benefit of absorbing moisture, which helps prevent mould from returning. Hydrogen peroxide is the most potent of the three, but it should be used with caution as it can damage delicate surfaces.

Conclusion

In conclusion, mould on ceilings must be addressed as soon as it is noticed to ensure a healthy environment and clean ceiling. Identifying and eliminating the source of mould is crucial to preventing its growth. The three main cleaning methods for removing mould from ceilings are vinegar, bicarbonate of soda, and hydrogen peroxide. All three methods are effective and safe to use, but hydrogen peroxide should be used with caution.

It is important to take precautions when cleaning mould, such as wearing gloves and a mask. Seek permission from the landlord if you are renting, and follow the instructions carefully for each cleaning method.

At Aspen Services, we offer professional cleaning services, including mould removal from ceilings. Our team of experts uses safe and effective methods to remove mould and prevent it from returning. Contact us today for a free quote and let us help you maintain a healthy environment and clean ceiling.